Today's wonderful and exciting Blog entry is a detail of a linear slide mechanism that Otto Jr. and I made today. This is for a much larger project that he and I are working on the details of which will be posted at a later date. Suffice it to say that this was the source of fun in the garage for the afternoon! I know your first thought must be "why make a slide when you can buy them?" The answer is "it's more fun this way!" Anyway on to the project...
The first thing that we had to do was find a suitable piece of metal to be used as the "base" of the slide. This was easy because I have a ton of metal bits laying around the garage. In that pile of a ton of bits we happen to run across the skeletal remains of a Samsung HT-DB6000 DVD Home Theater System, 5 Disc DVD changer, 500 Watt Stereo system. This system was broken and I took it apart a long time ago... trashed the parts that were not so interesting and saved the stuff that was. In fact some of what was inside this sucker made it into a power supply that I made. Click HERE for a recap of the power supply (scroll down a bit for the power supply). Anyway on to the project...
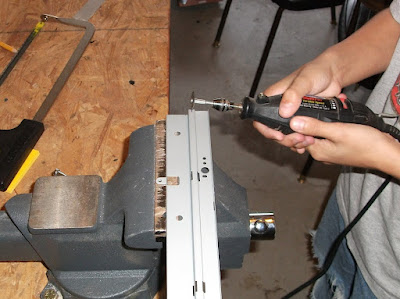
There was a piece of metal that used to hold the insides to the outsides in a box and Otto Jr. and I decided it would work well... with some slight modifications. Part of it was bent into a slight 'U' shape about a half inch wide. We cut the remainder of it off with a dremel. Remember you can click on any picture for a bigger view!
Above is a picture of Otto Jr. starting the cut. The part that we are going to save at this point is the side with the holes. Once Otto Jr. had got it going I stepped in to tear through it. The metal is electro-galvanized sheet metal, steel about .06" thick. Nice material...
The cutting went pretty well and was really loud with a lot of sparks and metal shavings etc... just the kind of thing I was looking for. If you are going to make something like this it's important to make a lot of noise and dirt and if you are really into it maybe a little smoke and fire as well otherwise it's not a very satisfying experience. We decided against the smoke and fire on this one and just made extra sparks and dirt to make up for it.
Who at Samsung would have guessed that there product would be so useful? Above is a picture of the rough cut. After making this cut we freed the piece that we were interested in with a perpendicular incision that joined the one you see in the picture. Once done Otto Jr managed to clean up all the burrs and rough edges with a file. He is getting pretty good at this stuff...
Observant readers will notice that in the picture above there appears to be a piece of while material in the vise and not the metal that you were anticipating seeing. Actually the metal is in there along with the plastic! Wow this is getting exciting!!! Yes because the metal piece is 'U' shaped it's not so easy to clamp it in the vise without damaging the U. It is important to preserve the U shape because that is what the other piece of metal will slide in. To prevent the U from being crushed in the vise while filing we slipped a piece of Delrin that I had laying around (actually the Delrin piece coincidentally is part of a Linear Slide that I have laying around... but using that for this project wouldn't be fun!) that happened to fit in the U.
Once that part was nice and smooth we took a flat piece of aluminum sheet and cut out a strip to be used as the sliding part. This piece was just under 1/2" wide when we were done with it. It started off a bit bigger and to get it ready for cutting Otto Jr straightened one edge with a file (see pic below) and then he cut it with a hack saw. He is getting pretty good at this stuff!
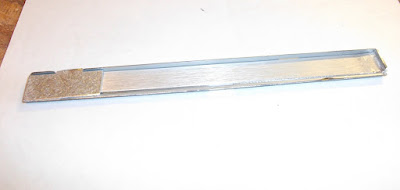
OK once he had it cut into a strip and deburred it was ready to put into action! I don't have a picture of the actual sawing that went on but trust me it was dirty, noise and fun just like the first parts of this project. There are a couple more parts that also had to be messed with to get this thing to work. First is we needed something to prevent the slide part from sliding all the way out on either end. We managed to do this by bending up a tab on the inner slide part and installing a plate for it to catch on. To keep it constrained in the other direction we bent up part of the U piece. Have a look at the pictures below and you will see what I mean.
In the picture above you can see a flat piece of aluminum on the left hand side... this is what catches the tab that we bent up on the slide part. In the above picture the slide is retracted or "all the way in" in layman's terms. You can get an exciting view of the tab in the picture below!!!!
That is it folks!!! The above picture shown the slide extended and you can get a pretty good view of the tabs that we bent up in the U piece. This will be held together for now with some tape until the balance of the design is refined and more materials procured by the procurement department (Translation: I'll dig through the garbage until I find more stuff to use) For a complete set of measured drawings of this project email me and I'll laugh at you.


No comments:
Post a Comment